Goals
- Make wheelchair trips using the power of a bicycle drivetrain.
- Keep our heads close enough together to talk.
- Use the existing wheelchair we had.
- Retain the ability to fold the wheelchair for car-based trips.
- Attach/Detach fairly quickly.
Early Concept
The overall design was modelled off old rickshaws. The tadpole design (with the two wheels in front) means that the cyclist's head come forwards towards the seated person's head and conversation is feasible. This contrasts strongly with the alternative where the wheelchair is towed behind and the occupant feels very distant.
As you can see, my first thought was to retain the bicycle handlebars and clip the bike forks onto some sort of axle placed between the wheels of the chair. The axle had to be unreasonably high, however, and I wasn't sure how to build a simple and strong attachment for the forks. Once I decided to modify the bike parts, I moved towards having the steering pivot in line with the wheel hubs.
You can also see that using blocks I was able to set up the tilt angle of the wheelchair to find the balance between feeling upright and raising the front wheels enough to avoid bumps and to get up driveways.
Planning the Back Half
The easiest way to draw up a plan was to cut up the donor bike, lay the parts out, and trace everything out life sized. Then I drew in straight lines to connect the parts, to represent new tubing.Note that I turned the steering tube upside down as the angles of the tubes coming from it matched the design better that way. This required swapping over the bearing races from top and bottom, which would have been hard without access to my uncle's hydraulic press to reseat them. This could probably have been avoided.
It is essential to try and position yourself amongst the parts. This photo reveals one of the big problems in the finished product - the wheelchair handles are too near my knees. The layout pictured wasn't the final plan, but sadly I failed to adjust sufficiently.
Welding
With much help from a welding nightclass, I was able to put the frame together. My tutor did the bending in the lower left of the photo, which was a bit complex for me.
I didn't have a proper jig for setting up the welds, and didn't get the top tube on the the same plane as the seat tube, resulting in a small list to the left. The result is tolerable, however.
Attachment to the Wheelchair
My uncle, an engineer, made this actually work for me. I brought him the rough idea and he did the important machining and welding. There are more moving parts and adjustability than I would or could have made myself.
- A baseplate clamped to the frame on each side
We started by making a surface on each side to which we could attach the crosspieces. The plates are just squares of mild steel, a couple mm thick. We didn't want to weaken the wheelchair by welding it, so everything can be detached. We made clamps to attach each plate at two points on the lower horizontal rail, and the wheel axle had enough extra thread for a third point of attachment.
- Steering tube
As mentioned above, our tube was turned upside down so we swapped the bearing races. We cut down the existing forks and used them to connect upper and lower cross pieces. The lower cross-piece was welded directly to the fork, but since the top of the fork was just a threaded tube we manufactured a new 'nut' to thread on the top.
My uncle made it a double ring, with the threaded nut to secure the fork/bearings and an outer ring which could rotate until the set-screws are tightened. This allowed rotational adjustment of the upper cross-piece, reducing by one the number of things we had to get just right when we welded those last parts.
- Cross pieces
The lower cross-piece was just a square-section tube with steel across each end into which we drilled and threaded a hole for the hardened bolts I bought at the local auto shop. We drilled matching (but unthreaded so slightly wider) holes into a couple short lengths of steel which we attached to each end and then tack-welded to the plates after positioning the steering tube and ensuring it was central and vertical.
For the upper cross pieces we made the end pieces first and bolted them to the plates. Then we fitted the cross-pieces on each side and tack-welded them at the sides and centre. Apparently there was some risk of deformation with all the final welding, so we did it in short spurts and things still fit reasonably well.
Brakes
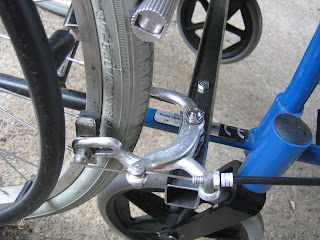
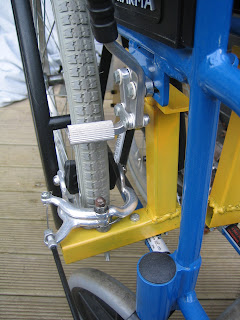
You don't want a bike, particularly not a heavy one, without brakes. The wheelchair only had lock-on brakes, which weren't good enough. I would have liked disc brakes, but couldn't see how to do that. What I did have was lots of old caliper brakes from 10-speeds, which I found fitted okay once I increased the spacing between the wheel and the (black) push-rim.
The first photo shows them attached to a cross-bar which runs right across the chair, but since this prevented folding I welded on a vertical piece and gained a second attachment point. Rough, but ready.
To pull the breaks I put some old mtb levers on the wheelchair handles. These are great when walking the chair down slopes, too - much nicer to squeeze the hands than lean back against the momentum of the chair.
Final Results
A few last pictures for you. Since all the special bits were detachable from the wheelchair it was easy to take them off and paint them a cheery yellow. The leftover paint served for the altered sections of the rear frame and the connectors.
I find that it takes a couple of minutes to bolt or unbolt - slightly longer when I'm out of practise. I added SPD pedals, because you want any extra power you can get on hills. As mentioned, the posture is a bit bent over and there is that slight list to the left, but for a first crack we've been very happy.
Another thing to mention is a seatbelt. We got a simple lap belt for Heather to use so she doesn't fall out if we hit a bump. It is scary enough facing traffic from that open front seat, so the psychological benefit is also important.
Gears
One thing I haven't mentioned is gearing. I have cables and levers for both the front and rear gears, but have never found a good way to mount them. In practise, I crash between top and bottom on the rear cluster, and never change from the smallest front ring. Not sure what I'll do about that.That's all for now. Hope it inspires you and helps with some practical details.
Martin.


